In the example below are the steps to create a new Documentary Record for issuing a Letter of credit.
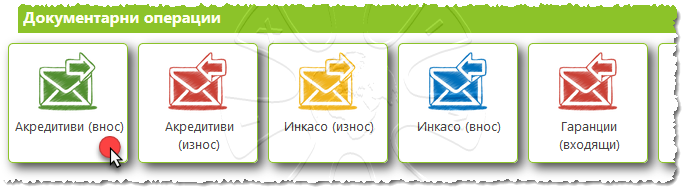
1)From the System Home screen, select the desired Documentary operation to load the respective Document Registry:
2)From the Document Registry, click on the "Create" button - click once on the button as shown below:
3)Select the "New" option from the drop-down menu:
Note that you can create a Documentary Record from the drop-down menu in one of four available approaches:
1.New - new blank Documentary Record;
2.Duplication - duplicate a Record from a pre-selected existing Record from the Documentary Registry;
3.From a file - create a Documentary Record from an external SWIFT file.
Note: Do consider that the drop-down menu options are contextual and appear depending on the actions you perform in the Registry. In the example below, a drop-down menu is displayed, after pre-selecting an existing Record of outgoing Letters of Credit. For more information on how to use it, read the chapter on Documentary Registry Organization.
The other button options from the menu in PTM'21 are also contextual and are shown or hidden depending on user’s choice, for example, the button “New Order” is visible only in selected Documentary Record.
4)Fill in the necessary detailed data for the Documentary Record: 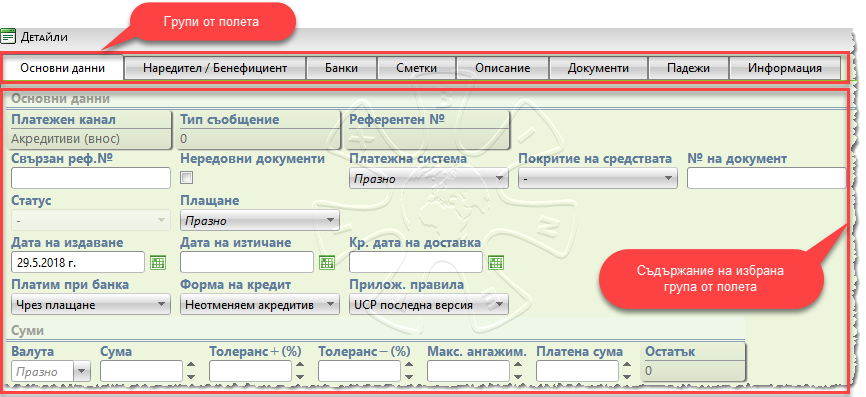
The detailed information screen contains groups of fields which are specific to each selected type of Documentary Record.
The fields are grouped as follows:
❑ Basic data - contains information related to the main requisites of the Documentary Record, such as reference numbers, dates, payment methods, sums of documents, tolerances (where applicable), etc.
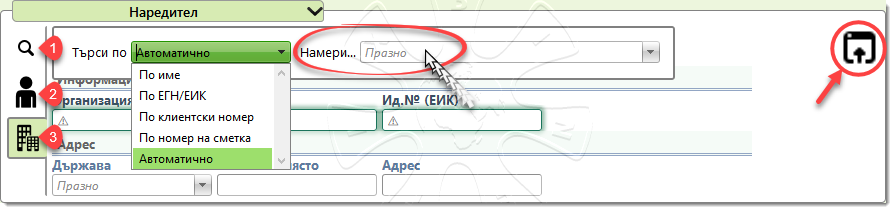
❑ Orderer - Contains data of the participants in the Documentary operation, such as the Orderer (ordering customer), the issuing bank, the beneficiary. The System offers the option to choose between individuals or legal entities as shown in the figure below:
The user has the options to:
✓to search for already registered clients in the Client Registry (position 1);
✓to enter data for individuals (position 2) or legal entities (position 3);
✓to perform quick save the entered data in the Client Registry (by pressing the button in the upper right corner)
❑ Banks - contains data on the participating banks in the respective Documentary operation, such as the bank of the Orderer, the issuing bank, the advising bank and etc.
❑ Accounts - contains details of the Orderer's and beneficiary's accounts;
❑ Description - contains additional fields to the Documentary Record describing goods and services, delivery methods, payment instructions and other requisites;
❑ Documents - contains a free text of the necessary documents to the Documentary Record;
❑ Maturity dates - allows entry of maturity dates when making deferred payments, collection of recurring fees and collecting sums of the Documentary Record;
❑ Information - information panel of the Documentary Record.
More information about the fields, respective documents, accounting operations and other data in the Documentary Record is provided in the chapter Reviewing and changing a Documentary Record.
5) Save the entered data - click the "Save and exit" button

There are three buttons in the lower left corner of the Details screen:
▪Save - pressing the button leads to a new Documentary Record to be created but the user stays on the screen to continue entering the Documentary Record. This button is particularly convenient when more data is to be entered, and intermediate savings of the Documentary Record need to be made. When the button is pressed again, data on the screen is overwritten in the current Documentary Record;
▪Save and exit - pressing the button causes a new Documentary Record to be created, the screen is exited and it returns you to the Documentary Registry main screen;
▪Cancel - pressing the button causes the refusal of the latest Documentary Record changes and the return to the main screen of the Documentary Registry. Keep in mind that if you haven't saved the Documentary Record, pressing this button will cause the whole Documentary Record to be canceled.
6) From the Documentary Registry, click on the "Refresh" button - this step is not required, but sometimes it is necessary if the System fails to automatically refresh the Registry.
|